HubSpot Copy Contact Properties into HubDB Table Using a Workflow
[September 2023]
A Tutorial with Full Code
When we first built this functionality, we were storing information on specific companies when a company property was changed to signify they were part of a membership program. In this example, we are storing event registrant information in a HubDB table for that event. (For more information on how we set this HubDB table up, please click here).
Other uses could be creating a directory listing to show on your website, training programs, etc. Keep us posted on how you utilize the workflow!
In this example, we use a form submission to enroll a contact in a workflow that passes their contact properties into a specific HubDB table.
Step 1:
In this first step, we are creating the Contact Properties that align with the data we want to store in HubDB.
Tip: Make sure the properties are of the same field type as the HubDB columns.
Step 2:
The second step is to create a form to capture the information to send to HubDB. This form will first update the contact properties and then will be used as the enrollment trigger for the Workflow.
To use the code provided in the custom element, you do not need to have a form – the form is just one way to capture the necessary information. In other use-cases, we have had other workflows trigger the data sync, for example.
Step 3:
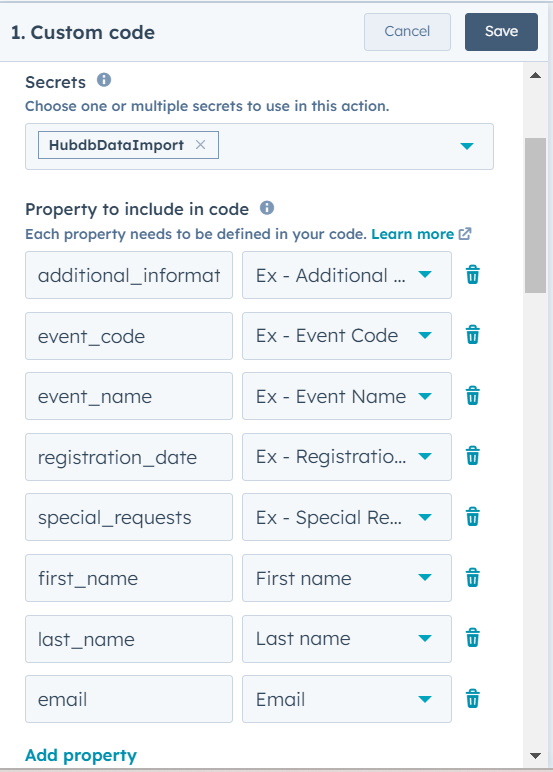
It is time to create the workflow! In this example we use a Contact Object workflow, however, if you are passing Company information to the HubDB table, you will want to use a Company Object.
Each workflow needs an enrollment trigger. If you created a form in the previous step, use a form submission as the trigger.
Step 4:
Time to test! When you think the code is complete, you can test in two different ways. The first is to publish the workflow and set a contact to fulfill the enrollment criteria (in this case submit the form). The second way, which allows you to test the custom code independent of the workflow is the “Test action” feature at the bottom of the Custom Code settings. Here you can select a Contact to run through the code.
In this case, we needed to:
- Ensure the contact properties were actually filled in for the test contact we were using.
- We had an issue where I misspelled one of the property keys…
When this was resolved, we were good to go!
The example here also showcases how text fields are formatted differently than dates and multi select properties. Remember, the properties should sync into cells of the same type. Below are examples of text, dates, and multi select for reference!
// Extract contact properties from the event

// Example text fields
    const hs_name = event.inputFields['event_name'];
    const first_name = event.inputFields['first_name'];

// Example date field
    const registration_date = parseInt(event.inputFields['registration_date']);

// Example multi select field
const additional_information = event.inputFields['additional_information'];
const info_list = [];

if (typeof additional_information !== 'undefined') {
  const infoItems = additional_information.split(";").map(item => ({
    "name": item,
    "type": "option"
  }));
  info_list.push(...infoItems);
}

console.log(additional_information);
console.log(info_list);
In this step, you will also need to make sure you map the values that you extract from the the contact properties to the correct Column ID – this can be found by going to the HubDB table and clicking Edit on the column header.
Additionally, if you have not yet, take the time to create an API key to utilize in the custom code. Information on how to do this is available on HubSpot.


